Listen to This Article:
We’ve all had this experience with a knife: the blade has gotten a little (or a lot) dull, and you’re trying to slice something that calls for precision, but you rip or tear the food instead. Or worse: a dull blade means you’re forced to put some extra oomph into the act of cutting, and the knife slips…a scary and potentially life-altering moment.
A sharp, well-maintained knife can be as important as any other tool in your kitchen. It helps you work not only safely, but faster and more efficiently. And depending on the type of knife, it’s an indispensable tool for making decorative cuts. However, with the right care, your knives can remain trusted sidekicks for decades.
Whether you’re pursuing a career in baking and pastry, want to work at a steakhouse, or are focused on plant-based meals, knife care is essential. Below, we’ll show you how you can get the most mileage out of your favorite knives.
Proper Care Starts With the Right Knife and Technique
For knives to last, they need to be used correctly. That begins with choosing the right knife for the job—using a boning knife to cut through meat and bones instead of a chef’s knife, for example. Or making sure not to chop through frozen foods with any knife. Also, get the highest quality knives your budget will allow. With proper care, they could last your entire career.
The correct knife cut is another key component in maintenance. Additionally, remember to use the backside, or spine, of the knife to scrape food off of a cutting board. A bench scraper is the best tool, but if you’re going to use a knife, don’t use the cutting side because you can bend and warp the blade.
Speaking of cutting boards, you want to use the right types. Wooden or plastic boards are better for knives than marble or glass, which can dull the blades. Consider plastic cutting boards for meats because they can go in the dishwasher at higher temperatures and help sanitize the board.
Help Prevent Bacteria and Damage by Cleaning and Drying After Each Use
Imagine what happens to the wooden handle of a knife if it’s left soaking in a sink of water and then set out to slowly air dry. Or envision the beating that knives take if they go into a dishwasher, where they are showered with scalding hot water and harsh detergent while being knocked against other utensils and the dishwasher rack.
The golden rule of knife care says to always wash knives by hand. Use warm soapy water, then dry thoroughly. Most knives are made of stainless steel or stainless steel coating that helps prevent rust, but you still need to clean and dry them right away to prevent damage. You don’t want bacteria building up in a wooden handle, either.
Understand also that acidic foods like fruit and tomatoes can eat away at the blade edge, so you want to clean any food remnants on your blade as soon as possible. You might also consider using a small paring knife instead of your chef’s knife for these foods, to spare your chef’s knife from unnecessary exposure.
For knives made of carbon steel, consider oiling your knife with a drop of a food-safe oil like mineral oil or camellia oil after drying it, using a cloth to rub the oil into the blade.

Wash knives by hand and then dry thoroughly to guard against rust.
How to Sharpen Your Knife
Sharpening a knife may seem daunting if you’ve never done it, and there are some tools out there that promise to make it easier. But items like electric sharpeners tend to remove more metal than is necessary and can permanently affect the knife’s balance. Fortunately, doing it the right way can be easier than you think.
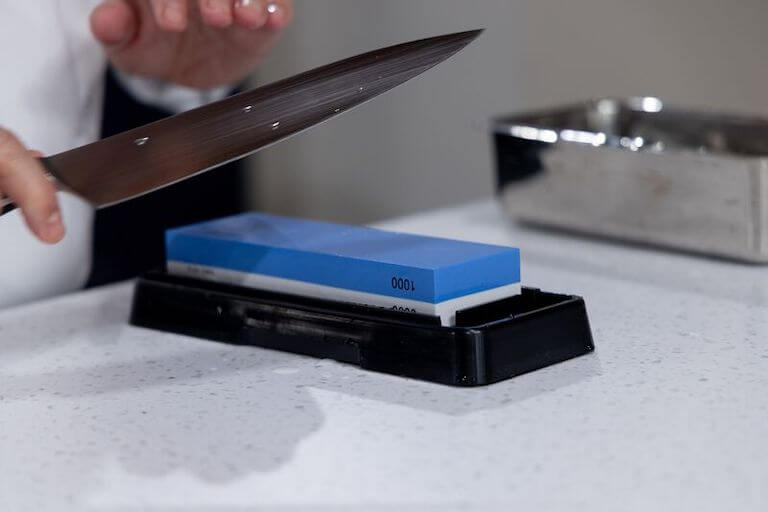
Instead of a fancy gadget, try a sharpening stone, also called a whetstone; it takes some practice but is worth the time and effort. When sharpening manually, you use a steady hand and keep a clear idea of the proper angle to position the blade on the stone.
Many stones have both a coarse and fine side, but you can also purchase two stones with differing levels of grit. More grit will give you a sharper blade, but it takes longer to achieve the desired results, so start with the coarser stone.
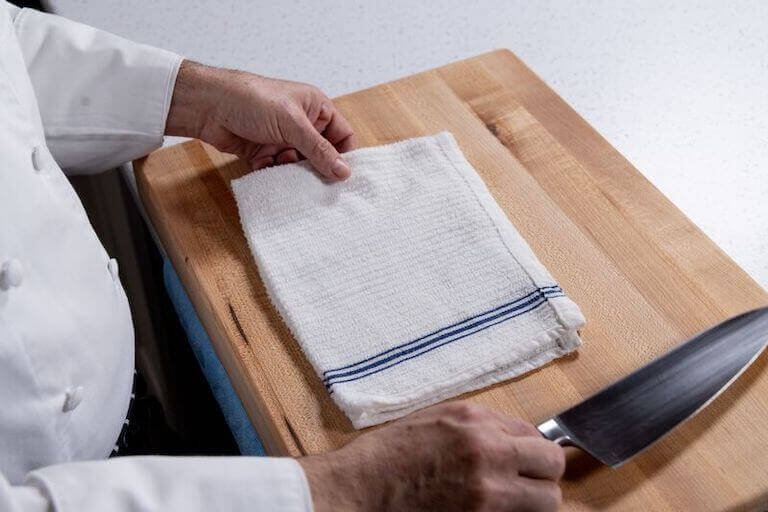
Keep the whetstone in place by setting it on a cutting board with a towel draped over top. Using both hands, position the knife at a 15 degree-angle for most Japanese knives or a 20-degree angle for most American and European ones, with the blade facing away from you. Consistently maintain the angle as you lightly pull the knife down the stone.
Repeat several times before flipping over the knife to sharpen the other side. Then, switch to the finer stone to finish sharpening the knife on both sides.
Keeping the Edge: Honing vs. Sharpening
Your knives’ blades can be sharp but still not function at their best. That’s because they need both sharpening and honing to stay in top shape.
Sharpening is a process that grinds away a small part of the knife to reshape the edge. Honing aligns the edge, which can bend and warp over time.
You should hone a knife before or after each use to keep the blade straight, while you only need to sharpen your knife once or twice a year, depending on use.
A variety of tools are available for the job. Honing is typically accomplished with a honing rod, made of steel or ceramic, while sharpening can be accomplished with manual pull-through sharpeners, electric sharpeners, sharpening stones, and whetstones.
One item of note: Japanese knives can only be sharpened using whetstones because they’re made of a harder steel and are thinner and more brittle than Western-style knives, so they will likely chip and break with other types of sharpeners.
Proper Honing Technique
Use the steel by holding it vertically and setting its tip on the counter. Hold the blade with its heel against the top of the steel and angled away at about 15 degrees. Apply light pressure as you move the knife down. Do the same on the other side of the blade, repeating for a total of eight to 10 strokes.

Proper care and maintenance is essential for effectiveness and longevity of your knives.
Proper Knife Storage Helps Longevity
Just like you don’t want to toss your knives into a dishwasher where they can bang against other utensils, you also don’t want to toss them into a kitchen drawer. Not only can the blade become damaged in a crowded drawer, but it can be dangerous for anyone reaching in.
Most chefs suggest using a magnetic wall strip for ease of access. These help free up counter space, and the knife blades aren’t hitting other utensils. If you do need to store knives in a drawer, look at knife covers or edge guards, or find drawer inserts to protect them.
Wooden storage blocks are another option, but they take up precious counter space and can be breeding grounds for bacteria. If you use a knife block, make sure those knives are completely dry when you put them back.
Find Out More About Tools of the Trade
Whatever culinary career path you choose, knife skills and knife upkeep will be important. You’ll want to know which knife to use for the job at hand, how to clean and store it, and how to ensure it lasts as long as possible.
A culinary school education can introduce you to the basics as well as advanced skills. You may find that your talent with knives is far beyond what you originally thought. Contact us to find out more about our wide range of culinary programs!
TO DISCOVER MORE ABOUT CULINARY TOOLS AND TECHNIQUES, CHECK OUT THESE ARTICLES:
- How to Organize Your Home Kitchen Like a Professional Chef
- Learning How to Cook: A Guide for Beginners
- 10 Tools You Need in Your Chef Utility Belt
*Information may not reflect every student’s experience. Results and outcomes may be based on several factors, such as geographical region or previous experience.
*This article was originally published on Dec. 21, 2017, and has since been updated.

