Listen to This Article:
Have you ever marveled at an exquisite sugar sculpture and wondered how such edible art is created? Get ready to step into a world where sugar becomes a canvas for endless creativity.
Sugar sculpting is the art of creating intricate, edible sculptures using sugar as the primary medium. From simple edible flowers topping a wedding cake to crafting an exquisite sugar castle sculpture for a centerpiece at a high-end event, edible art allows chefs to combine their passion for baking with science and creativity to unleash their artistic side.
In this article, we will explore sugar sculpting with the help of Escoffier Baking & Pastry Chef Instructor Tracy DeWitt, uncovering the techniques, tools, and creative processes that make this unique culinary art form so enchanting.
Defining Sugar Sculpting: From Simple Sugar to Edible Art
Sugar artistry involves heating sugar to a liquid form and then using specialized tools and techniques to transform it into stunning, edible masterpieces as it cools and hardens. The art of sugar sculpting dates back to the Renaissance period, when intricate sugar creations were used to display wealth and status during lavish banquets. Over time, the craft evolved with new tools and techniques, making it more widely used and appreciated.
Sugar sculpting shouldn’t be confused with candy making. While both involve working with sugar, they serve different purposes.
Candy making uses sugar to create treats like candy canes, old-fashioned ribbon candy, and lollipops that are often mass-produced. Though these candies require skill and specific techniques, such as pulling to create ribbon candy, the primary goal is to produce a delicious treat.
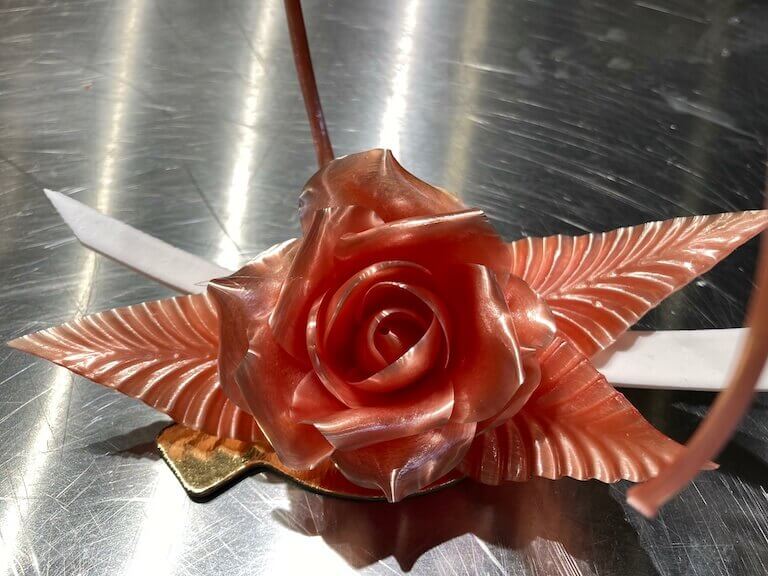
In contrast, sculpting sugar elevates it to an art form. Sugar sculptors use techniques and specialized tools to craft pieces that are used as artistic displays or centerpieces. For example, the same pulling technique used to create ribbon candy is applied in sugar sculpting to form delicate leaves and petals for a flower.
In culinary competitions, you might see elaborate sugar showpieces, such as lifelike sugar animals or detailed replicas of famous landmarks, demonstrating the advanced artistry involved in this craft.
Both candy making and sugar sculpting share a common ingredient, but their goals and the level of artistry involved set them apart.
What Type of Sugar Do You Use in Sugar Sculpting?
The type of sugar used in sugar sculpting is crucial to achieving the desired texture, clarity, and durability of the final piece. While regular granulated sugar is commonly used, there are other types of sugar that offer different properties suitable for various sculpting techniques.

Choosing the right type of sugar for your decorative piece is important for achieving your desired results.
Granulated sugar
Granulated sugar, from cane sugar or beet sugar, is the most basic sugar used in edible art. It’s heated until around 300° F–310° F when it reaches the “hard crack” where it’s moldable but able to harden as it cools. This type of sugar is ideal for traditional sugar pulling and casting where the clarity and strength of the sugar are important.
Although granulated sugar can slightly caramelize during heating, resulting in a colored hue, it remains a versatile choice for many sugar artists due to its accessibility and ease of use.
What is the Hard Crack Stage in Sugar Sculpting?
When sugar reaches the “hard crack” stage there is almost no moisture left in the sugar. This stage is typically reached between 300° F–310° F. If you drop some of the sugar syrup into water at this stage, it will harden instantly into breakable strands. When sugar is air-cooled from this stage, it hardens into a glass-like substance allowing it to hold intricate details.
Isomalt
Isomalt is a very popular sugar substitute with professional sugar artists. It’s heat resistant, making it less prone to burning and crystallization (which ruins sugar sculptures by making the sugar syrup lumpy and gritty). It’s easier to work with at high temperatures, looks glass-like when cooled, and absorbs less moisture from the air, making it better to work with in humid environments. Isomalt can also be a good option for those with diabetes because it has a minimal effect on blood sugar levels.
Isomalt isn’t difficult to locate and purchase, but it’s also not something you’re likely to find in the everyday home kitchen. It’s a sugar substitute derived from beet sugar. It’s often used in edible art because of how easy it is to work with. Isomalt also doesn’t caramelize like sugar when heated and remains clear in color, where sugar can take on a light-brown/yellowish hue.
Because isomalt is considered a sugar alcohol, it’s not meant to be consumed in large quantities. Therefore, it’s not a sugar substitute you would use in baked goods. Your body can’t fully absorb it, meaning if you consume it in large quantities, it can lead to an upset stomach.
Powdered sugar
Powdered sugar, also known as confectioners’ sugar, can be used in making pastillage. The powdered sugar is mixed with water, gelatin, and other ingredients to create a dough-like substance that can be rolled and cut into intricate shapes.
It hardens quickly and is ideal for structural elements in sugar sculptures, such as delicate frames, intricate decorations, or other detailed components that require precision and stability. For example, pastillage can be used to craft delicate sugar frames or filigree decorations, like the ornate arches of a miniature sugar cathedral or the intricate details of a sugar gazebo.
Sugar syrup
Dissolving granulated sugar in water and heating it creates sugar syrup. It’s versatile in sugar art and can be used to create spun sugar pieces like webs and nests and can also be used like a glue to bind other sugar pieces together. The syrup’s consistency can be adjusted by controlling the temperature during cooking, making it a flexible medium for various sugar art applications.
Heat Stages of Sugar in Candy Making: A Guide to Temperature and Uses
| Stage | Temperature (°F) | Description | Uses |
|---|---|---|---|
| Thread Stage | 230°F – 234°F | Sugar syrup forms thin threads that dissolve easily in water. | Syrups, glazes, making fruit sauces |
| Soft Ball Stage | 235°F – 240°F | Sugar syrup forms a soft, flexible ball when dropped into cold water, which flattens when removed. | Fudge, fondant, pralines, caramels |
| Firm Ball Stage | 245°F – 250°F | Sugar syrup forms a firm ball that retains its shape but is still pliable when pressed. | Nougat, gummies, divinity |
| Hard Ball Stage | 250°F – 266°F | Sugar syrup forms a hard ball that is solid but can still be slightly deformed when pressed. | Marshmallows, rock candy, butterscotch |
| Soft Crack Stage | 270°F – 290°F | Sugar syrup forms threads that are firm yet pliable, and can bend before breaking. | Taffy, butterscotch, toffee |
| Hard Crack | 300°F – 315°F | Sugar syrup forms brittle threads that break easily when cooled. | Hard candy, lollipops, brittle, sugar art |
| Caramel Stage | 320°F – 340°F | Has a golden brown color, with a nutty smell. | Caramels, nougatine |
Techniques of Sugar Sculpting
Sugar sculpting requires a variety of basic and advanced techniques, each with its own unique purpose. Whether you’re a novice starting with simple shapes or an experienced artist crafting intricate designs, understanding these techniques is essential to creating stunning edible art.
Pulling to Create Simple Shapes like Ribbons, Bows, and Basic Forms
To craft ribbons, bows, and other simple shapes, the primary technique you’ll use is Pulling Sugar. This technique involves heating sugar until it’s pliable and stretching it repeatedly to create a smooth, shiny surface. As you develop your skills, you can experiment with more advanced pulling techniques to create multi-layered decorations, such as delicate flower petals or intricate leaves.
Pro-Tip from Escoffier Baking & Pastry Chef Instructor Tracy DeWitt
“The cooler the sugar is when you are pulling the better “shine” you will attain. If you pull it when it’s too hot, it will not get shiny. The shine has to be reworked with additional pulling after each warm-up under the heat lamp.”
Blowing to Craft Hollow Shapes like Balls, Ornaments, and Bubbles
For hollow shapes like balls, ornaments, and bubbles, the technique of Blowing Sugar is essential. Air is blown into a mass of molten sugar using a sugar pump, creating delicate, hollow forms. Advanced skill in this area requires precise control of temperature and air pressure to achieve complex shapes and finer details, making it more challenging than basic blowing techniques.

Shaping techniques can help you create artistic scenes through sugar.
Casting and Molding for Consistent, Repetitive Shapes like Cake Toppers, Ornaments, and Decorative Pieces
When your goal is to produce consistent, repetitive shapes such as wedding cake toppers, decorative ornaments, or candy, Casting or Molding Sugar is the technique of choice. This technique involves pouring melted sugar into molds to create specific shapes as the sugar syrup cools and hardens.
For example, you might use a mold to create multiple identical flowers or stars for decorating a large cake. You can also combine casting with other techniques to create multi-component sculptures that require assembling various cast pieces, such as an intricate house with molded windows and doors.
Crafting Unique Shapes and Structural Elements with Custom Designs and Pastillage
Silicone molds offer the flexibility to produce custom designs, allowing for complex, repeated patterns with fine details. This method is particularly useful when you need to replicate intricate shapes consistently.
For more intricate structural elements and detailed decorations, the technique of Pastillage is often used. This technique involves making a sugar paste that quickly hardens but can be rolled and cut into different shapes. It’s ideal for creating sturdy, precision-cut components that are often required in complex sugar sculptures.
Spinning for Finishing Touches like Decorative Webs, Nests, and Color Accents
Once your sculpture is formed, you can add delicate finishing touches by Spinning Sugar. In this technique, melted sugar is spun into fine threads that look like cotton candy. It’s used to create edible pieces like webs and decorative nests.
Finally, to enhance the visual appeal and realism of your sugar sculptures, Coloring and Airbrushing are key techniques to use. You can bring your sugar art to life and incorporate eye-catching detail by incorporating color to your pieces.
Mastering these shaping, molding, and finishing techniques is crucial for creating intricate and stunning sugar sculptures. Each method contributes to the overall artistry and precision required in this craft.
Tools Used for Sugar Sculpting
The right tools are essential for creating intricate and precise sugar sculptures. Tools like sugar pumps are essential for creating delicate sugar bubbles, while silicone molds are used to produce intricate sugar lace patterns that can beautifully adorn wedding cakes.
Basic Tools
These tools are fundamental for any sugar sculpting project, helping you to heat, handle, and shape the sugar properly.
- Heat Lamps: Keep sugar pliable while you work by providing consistent heat.
- Candy Thermometer: Monitor the temperature of the sugar mixture to ensure it reaches the hard crack stage at 320°F.
- Silicone Baking Mats: Provide a non-stick surface for pouring and cooling hot sugar.
- Heat-Resistant Gloves: Protect your hands from high temperatures during the sculpting process.
- Desiccant Packets: Help control humidity around sugar sculptures, preserving them by absorbing excess moisture.
- Blow Torch: Helps remove bubbles from the surface of the cast pieces. A torch or a can of Sterno heat with a wick can glue pieces together during assembly.
- Scissors: Used to cut flower petals, leaves, and other small items.
Shaping and Molding Tools
These tools are used to shape and mold sugar into various forms, from basic shapes to intricate designs.
- Sugar Pumps: Used to blow air into sugar, creating hollow shapes like bubbles and balls.
- Molds and Silicone Molds: Available in various shapes and sizes to form consistent sugar shapes. In addition, you can use a simple metal cookie cutter that is lightly oiled for a casting mold.
- Tweezers and Small Knives: Precision tools for detailed work, refining details, and assembling pieces.
Finishing Tools
Finishing tools add the final touches to your sugar sculptures, enhancing their visual appeal and realism.
- Airbrush Kits: Allow for the precise application of color, adding shading and detail.
- Brushes and Food Colors: Used for hand-painting fine details and adding finishing touches.
Having the right tools is crucial for successful sugar sculpting. Investing in quality equipment can make a significant difference in the ease and precision of your work.
Step-by-Step Guide to Creating a Simple Sugar Sculpture
Creating a simple sugar sculpture can be a rewarding way to apply the techniques you’ve learned. Follow these steps to craft your own edible masterpiece.
Safety Disclaimer:
Working with melted sugar requires extreme caution, as it reaches very high temperatures—similar to boiling water or hotter. Always use heat-resistant gloves, long sleeves, and eye protection to prevent burns. Keep a bowl of ice water nearby in case of accidental contact with hot sugar. Never leave melted sugar unattended, and be mindful of your surroundings to ensure a safe working environment.
1. Select a design
Choose a simple design to start with, such as a basic flower or a small animal. This will allow you to practice fundamental techniques like pulling and molding without being overwhelmed by complexity.

With practice, you can build your sugar sculpting skills to include multi-layered pieces.
2. Prepare the sugar
Ingredients:
- 2 cups granulated sugar
- 1/2 cup water
- 1/4 cup glucose or light corn syrup
Instructions:
- Combine the sugar, water, and glucose (or corn syrup) in a heavy saucepan.
- Stir the mixture over medium heat until the sugar dissolves completely.
- Increase the heat to high and bring the mixture to a boil. Clean the sides of the pan with a clean, wet pastry brush or spray bottle to ensure no undissolved crystals of sugar are left behind. Use a candy thermometer to monitor the temperature. Water-soluble food coloring can be added during boiling.
- Once the mixture reaches 307-310°F (the hard crack stage), remove it from the heat. Shock the bottom of the pan in an ice bath for 5 seconds. Remove from the ice bath and wipe the bottom of the pan to remove any drips of water.
- Cool the sugar for 5 minutes and then pour the hot sugar onto a silicone baking mat (preferred) or a lightly oiled marble slab to cool slightly. Be cautious, as the sugar will be extremely hot.
3. The Sculpting Process
While the sugar is still pliable, begin shaping it using basic techniques like pulling and molding.
Pulling Sugar:
- Wear heat-resistant gloves to protect your hands. Pour the hot sugar onto a silicone mat.
- Gather a portion of the sugar and start pulling it repeatedly to create a smooth, shiny surface. If it begins to harden too quickly, keep it under a heat lamp.
- Shape the pulled sugar into petals if making a flower, or into simple forms for other designs.
Molding Sugar (To cast the sugar):
- Pour the hot sugar into silicone molds if you want consistent shapes. Alternatively, use lightly oiled metal bars to create square or rectangle shapes for molding; they are cheaper than buying a silicone mold. After pouring the sugar, use a blowtorch to remove any excess bubbles on the surface, gently waving the torch across the surface of the sugar.
- Allow the sugar to cool and harden in the molds before removing the pieces. Store airtight with desiccant.
4. Assemble the Structure
- Use a small amount of melted sugar as glue to attach different pieces of your sculpture together.
- Assemble the petals to form a complete flower or attach various parts to complete your chosen design.
- Use tools like tweezers and small knives to refine details and ensure the pieces fit together seamlessly.
5. Preserving the Sculpture
- Once your sculpture is complete, allow it to cool and harden fully.
- Store the finished piece in a cool, dry place to prevent it from absorbing moisture and becoming sticky.
- Avoid exposing the sculpture to direct sunlight or high humidity, as this can cause it to melt or lose its shape.
Remember that practicing will help you continue to improve your skills. Be patient, take your time, and reflect on what worked and what didn’t each time, so you can make adjustments with each new creation.
Challenges When Working with Sugar
Sugar sculpting is a delicate art that requires careful attention to detail and precise control of the working environment. Here are some common challenges you may encounter and how to overcome them:
Challenge: Temperature control
Maintaining the correct temperature is crucial in sugar sculpting. Sugar must be heated to the ‘hard crack’ stage to achieve the right consistency for sculpting. If the temperature fluctuates, it can affect the pliability and structure of the sugar.
Solution: Use a reliable candy thermometer to monitor the temperature closely. Work quickly once the sugar reaches the desired temperature to ensure it remains pliable.
Challenge: Avoiding crystallization
Crystallization occurs when sugar molecules form crystals, making the mixture grainy and unusable for sculpting. This can happen if the sugar is not dissolved properly or if impurities are introduced during the cooking process.
Solution: Ensure that the sugar is completely dissolved before it reaches a boil to avoid crystallization. You can also try adding a small amount of glucose or light corn syrup. Clean the inside side of the pan with a clean, wet pastry brush, or a spray bottle of water. Avoid stirring the sugar once it starts to boil, as this can introduce air bubbles, impurities, and will cause crystals to form.
Challenge: Humidity
Sugar is hygroscopic, meaning it absorbs moisture from the air. High humidity can cause sugar sculptures to become sticky, lose their shape, or even melt.
Solution: Work in a low-humidity environment whenever possible. Use a dehumidifier in your workspace to control the humidity levels. Store finished sugar sculptures in airtight containers with desiccant packets to absorb excess moisture.
Consistent practice will help you become more adept at managing the various challenges of working with sugar. By understanding and addressing these challenges, you can improve your sugar sculpting skills and create stunning, stable edible art.
Learning and Improving Your Sugar Sculpting Skills
Sugar sculpting blends art and science, transforming simple sugar into stunning, edible masterpieces. From mastering basic techniques to overcoming challenges like temperature control and humidity, this craft requires creativity and precision.
Consistent practice can help you develop your techniques, so don’t be afraid to try new ideas and experiment with different techniques to find what works best for you.
If sugar sculpting has sparked your interest, you might enjoy diving deeper into the world of baking and pastry arts. At Auguste Escoffier School of Culinary Arts, our Baking & Pastry Arts degree or diploma can offer courses that cover a wide range of skills, including sugar artistry.
Contact us today to learn more and let your imagination and skills shine in the sweet world of sugar sculpting!

