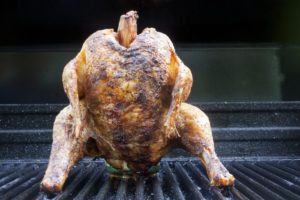
When it comes to grilling, we’re game for just about anything. That’s especially true when you combine two of our favorite things: beer and succulent chicken. The beer can chicken may be the greatest thing to ever happen to modern grilling. And before you think it, let’s clear up one thing: no, the chicken doesn’t taste like beer. What it does taste like is delicious, juicy chicken that’s nearly impossible to 
So, read on and this culinary school will teach you how to make your very own beer can chicken. It’s the perfect recipe for a lazy summer night where you can enjoy a beer (or two) and sit back, relax and let the grill do all the work.
Step 1: Prep The Chicken
For beer can chicken, a smaller bird is best so remember that when you’re shopping. A 2 to 4 lb bird should do the trick. First off you’re going to rinse the chicken under cold water briefly and then pat dry. Rub the entire bird with olive oil until every surface is covered. Then apply your rub and don’t be afraid to be generous! Let sit in the refrigerator for about an hour to let the flavors marinade.
Step 2: Prep The Grill
After about an hour, start your grill. Light as many coals as your chimney can hold because beer can chicken has a long cook time. When coals are ready, push to one side and set a small heat resistant container filled with water on the open side of the grill.
Step 3: Beer Can The Chicken
Get your can of cheap, domestic beer like Budweiser, PBR or Miller. Here comes the best part—drink half the beer. Then grab your chicken from the fridge and carefully place the chicken on top of the beer can. The can should be inserted in the chicken’s cavity. Rearrange the legs so the chicken sits sturdily with no chance of tipping over. Add your chicken to the grill on the side where the water pan is. Throw on the cover and relax because all the hard work is done. We recommend checking to make sure there’s water in the pan every 30 minutes and that the coals are still going strong. If need be, you may need to heat up some more coals but that’s not a big deal!
Step 4: Eat The Chicken
The chicken is done when the internal temperature on the breast has reached 165F and 175F in the thigh area, about 1 hour to 1.5 hours later. Remove from the grill and let rest for about 15 minutes before carving so it retains all of its yummy juices and you get maximum tenderness. Using tongs, grab the bottom of the beer can and remove from the kitchen. Carve and serve!
And there you have it. No more dry to the bone chicken that leaves you wanting for something more. The beer can chicken is by far one of the greatest contributions to the modern grilling world. Also, if you’re feeling a little beer can chicken when the weather is less than cooperative, you can also do it in the oven as long as you have a large pan on the rack underneath to catch all of the juices.

